
Thinking about the Omnipod 5 — Iron Man?
“Call me the billionaire playboy!”

Want to listen to the podcast on this?
Episode 5: Mastering Omnipod 5 – The Iron Man of AID. We focus on the sleek, tubeless Omnipod 5, a system that provides automated insulin adjustments with SmartAdjust technology. We discuss how to set it up, avoid common pitfalls, and optimise insulin dosing for meals and activity.
You can look forward to:
- Tubeless design that makes it discreet and easy to wear
- Highly automated, requiring little user input, and simple to set up and operate
- The algorithm housed inside the Pod, allowing seamless automated adjustments
If you select the Omnipod 5, here are the essentials:
- How the algorithm works
- Starting settings
- Tips and tricks
- Preventing and treating hypos
- High-fat meals
- Exercise
How the algorithm works
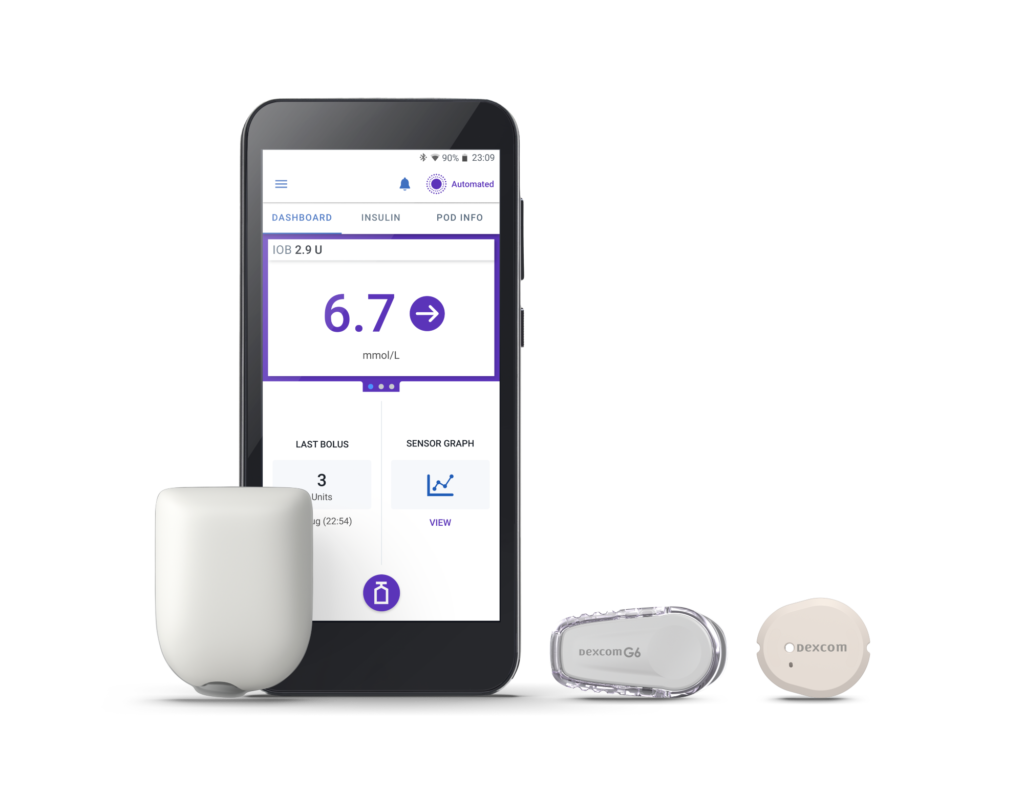
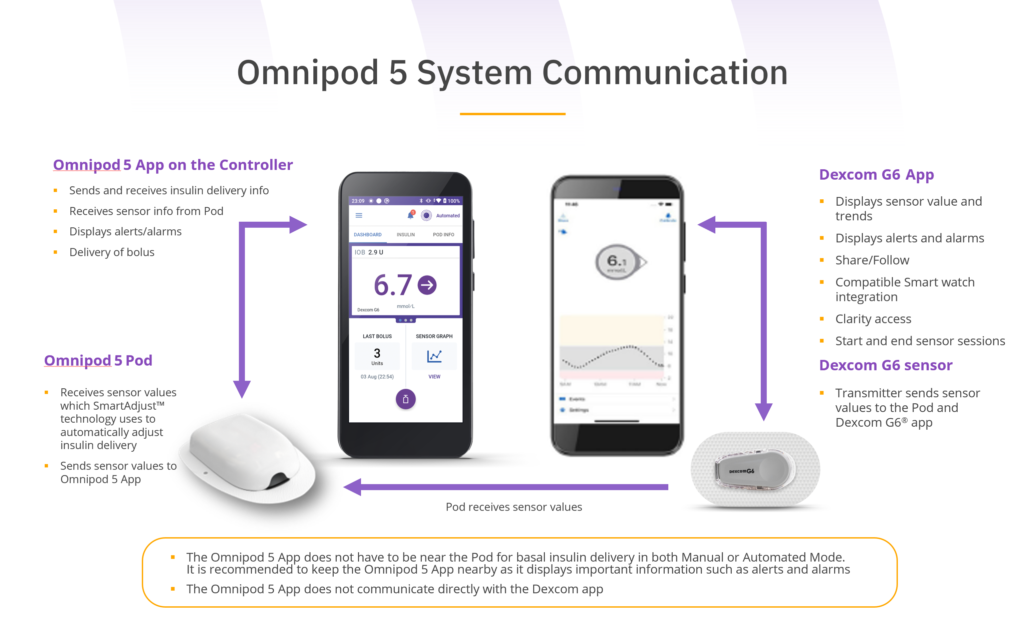
Omnipod 5 has four components:
- The Omnipod 5 controller
- A Dexcom G6 or G7 compatible phone if using a Dexcom sensor
- If using FreeStyle Libre 2 Plus, no phone is needed for operation, but there are no followers
- The Omnipod Pod (algorithm inside the pod), with no tubing

Take-homes
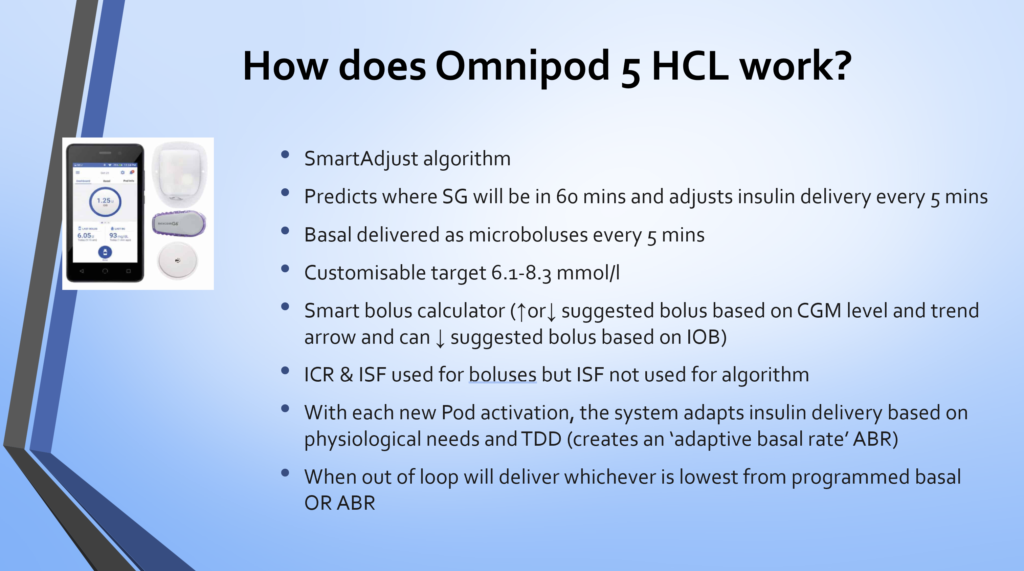
- The algorithm works from an automatically calculated basal rate, called the Adaptive Basal Rate.
- Basal insulin increases when glucose is rising and is reduced or stopped when it is dropping, with updates every five minutes.
Starting settings
SmartAdjust needs one basal rate and a 24-hour total basal amount to start. The first Pod works at roughly half potential; from the second Pod onwards, the algorithm runs at full strength.
Starting an AID system can be broken down into two phases:
SURVIVE
THRIVE
You can download the How to Survive and Thrive — Omnipod 5. A more comprehensive onboarding workbook is also available: Omnipod 5 Workbook.
Tips and tricks
If you want to reach 70% or more time in range, do not forget the basics:
- Three balanced meals
- Accurate carbohydrate counting
- Bolus insulin 10–20 minutes before eating
- Be active for 10–15 minutes after eating
- Rotate cannula / pod sites
Follow the above and you may find: 99 Problems But Highs Ain’t One (download/use/share)
Other things to be aware of:
- You need a compatible phone to operate Dexcom G6/G7. No phone, no data, no work.
- The Pod holds up to 200 units of insulin, so it may not last the full three days if you use more than ~65 units per day.
Preventing and treating hypos
It would be ideal if hypos were a thing of the past — but they will still happen.
The algorithm can prevent many overnight hypos.
However, if you give too much bolus insulin for a meal or exercise without planning, hypos will still occur.
You will often need less hypo treatment than before because the algorithm will generally have reduced or stopped insulin at least 30 minutes earlier.
You may also want to treat pre-emptively if glucose is 4.0–6.0 mmol/L (70–110 mg/dL) and trending down.
This guide is based on weight; the example shown is for a 30 kg person, but weight can be adjusted. The Survive and Thrive — Omnipod 5 guide generates a personalised chart once you enter your weight.
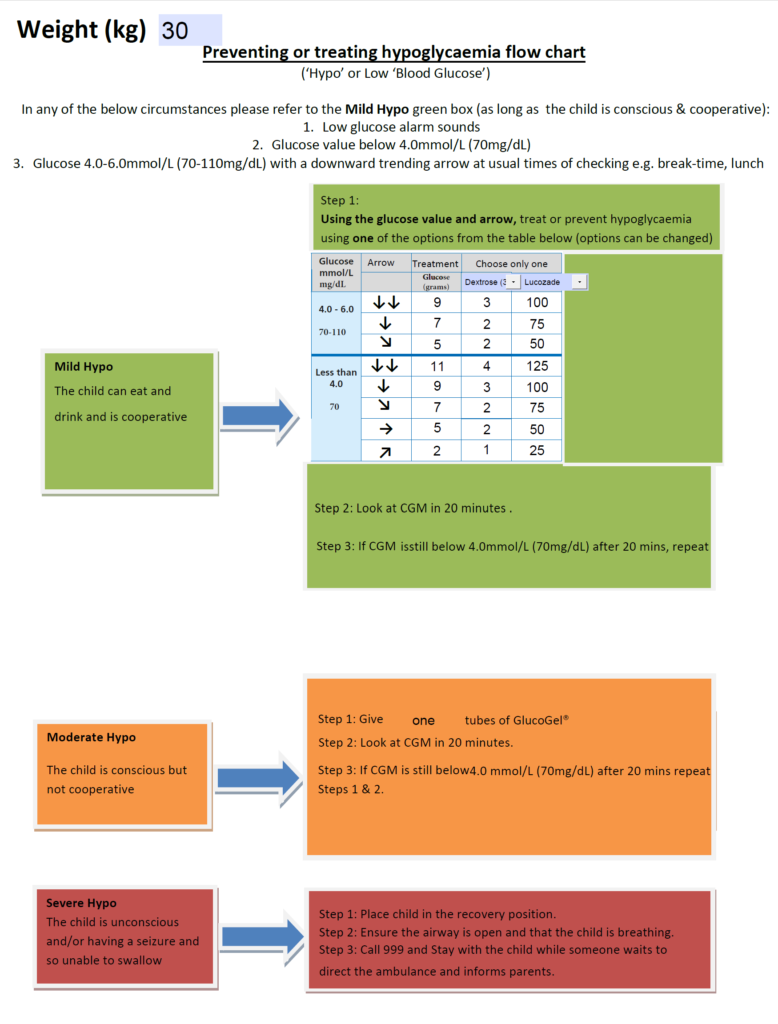
If you want this hypo guide, download it here.
High-fat meals
We know from the Mealtime Insulin Guide that high-fat meals with carbohydrates, such as pizza and takeaways, require additional insulin.
In theory, if you enter 100% of the carbohydrates eaten, SmartAdjust should handle the delayed rise. In practice, a degree of trial and error is often required.
Some people need to enter 25–50% extra “fake carbs” 90 minutes after eating to counter the delayed rise and insulin resistance seen with high-fat meals. For example, if the meal contains 100 g carbohydrate, enter 100 g upfront and an additional 25–50 g 90 minutes later.
Exercise
There is a quick method and a more comprehensive planned method.
The quick method
Turn on Activity mode before starting exercise — ideally 90 minutes beforehand. Then take small carbohydrate top-ups every 20 minutes as needed.
Avoid large carbohydrate loads all at once, as glucose may spike and the algorithm may increase insulin, raising hypo risk.
How many grams every 20 minutes?
It depends on body weight. Here is an example for a 50 kg person. The Survive and Thrive — Omnipod 5 guide will generate a personalised chart once you enter your weight.
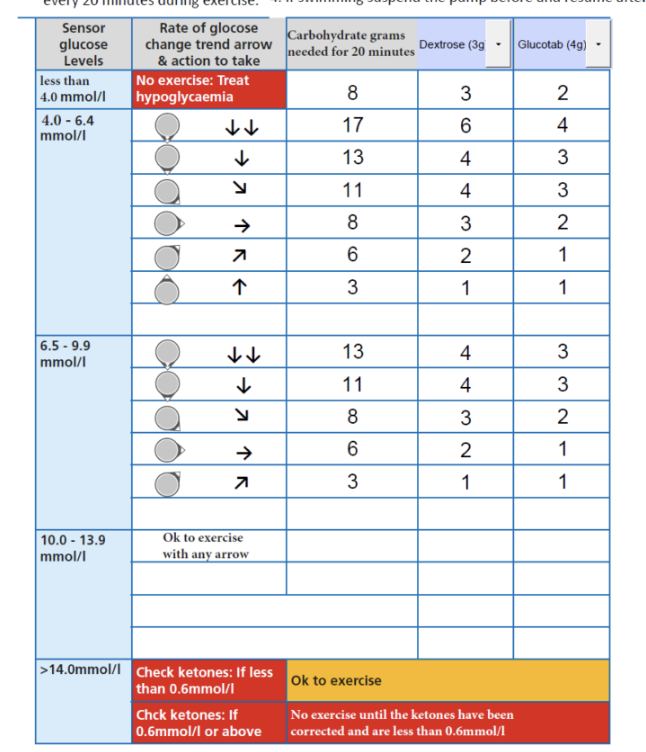
You can download the generic exercise carb charts here: mmol/L and mg/dL.
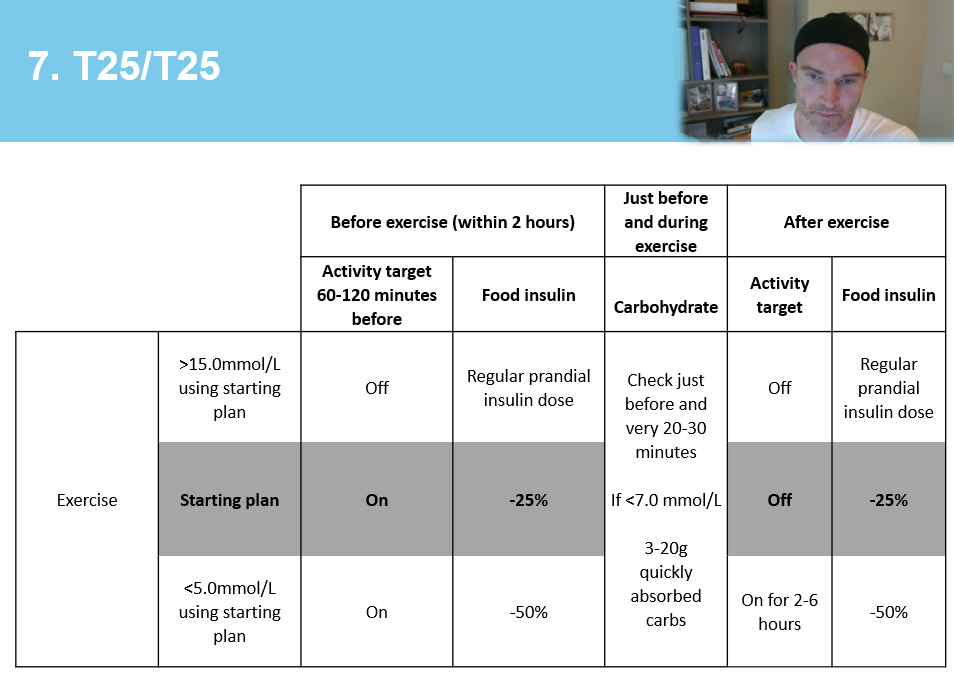
The comprehensive planned method
To use this method, work through the Exercise Guide. You need to understand exercise types, bolus reductions, and how to adjust plans after trials.
Read it?
Great — you are up to speed with exercise management.
The T25/T25 table should now make sense. If you have not read the article on the recent AID and Exercise Consensus Guideline, the infographic under the T25/T25 grid is particularly useful.
This downloadable exercise tool for Omnipod 5 makes creating and adapting exercise plans easier.

Go forth and conquer Omnipod 5.
Check out the top ten tips to optimise time in range when using an AID system.
Ready for the different AID systems?
Jump to a system:
- Choosing an AID System: Which Superhero?
- Tandem t:slim X2 with Control-IQ → Spider-Man
- Medtronic 780G → The Incredible Hulk
- CamAPS FX → Batman (see also: CamAPS FX FAQ)
- Omnipod 5 → Iron Man
Other useful AID resources:
Amazing advice – thank you!
I suggest to simplify everything especially insulin to carb ratio and how to break down every foods that are high in carbohydrates and fats. I’m new to the OP5, and I am desperately wanting to get rid of the big tummy I have and started going to the gym 2 weeks ago but do moderate exercises. I really wanted to loose all pounds I have gained for the past 2 yrs and wanted to achieve it by following the restricted carb diet.
Hi Glucose never lies!
I am a new user on the omnipod and have been looking at the Survival guide, I am wondering how to interpret the blank trend-cellspace in regards to freestyle libre in the GAME-SET-MATCH-chart. I dont recall ever seeing a sensor value without an arrow.
just use the ones for the arrows, the other CGM offer another level of soeed that allows firther suggestions